There is nothing as comforting as a slice of fresh, warm bread. This homemade challah bread recipe walks you through a classic, step-by-step, and is perfect for a weekend brunch.
Looking for an easy challah recipe?
Sure, store-bought challah is fine, but there’s something about the smell of fresh bread wafting through your kitchen that’s pure magic. And challah is surprisingly easy!
Challah is a traditional Jewish bread made with your basic bread ingredients. This light and fluffy bread is perfect for serving at your next special occasion or for making the best French toast whether you’re keeping it classic or whipping up some Grand Marnier French toast!
What Is Challah?
Challah bread boasts a rich history deeply tied to Jewish culture. While the exact origins are a bit fuzzy, evidence suggests it appeared sometime around the Second Temple period in Jerusalem, roughly 2,000 years ago. Back then, separating a portion of dough, called challah, was a commandment for Jewish people. This portion was typically given to the priests.
Over time, the word “challah” came to refer to the entire bread itself, not just the separated portion. As bread-making techniques evolved, challah took on a special significance, particularly for Shabbat, the Jewish day of rest. It became a traditional part of the Shabbat meal, symbolizing peace, togetherness, and manna, the heavenly bread that sustained the Israelites during their wanderings in the desert.
Today, challah bread remains a beloved staple in Jewish households around the world. It’s enjoyed on major Jewish holidays like Rosh Hashanah and Shabbat, but it’s also a delicious and meaningful bread to grace any dinner table.
What you’ll love about this recipe:
What You Need to Make Challah
How to Make Challah from Scratch
Make the Dough Starter
- We begin by creating a dough starter, which activates the yeast and lays the foundation for our bread’s rise. In a small bowl, combine warm water and active dry yeast. Let this mixture sit for about 5 minutes until it becomes foamy and bubbly – this indicates the yeast is active.
- Next, we’ll use a stand mixer for ease. With the dough hook attachment in place, whisk together the flour, the bubbly yeast mixture, honey, and room temperature eggs. Mix until everything is well combined and a smooth dough forms. Cover the bowl tightly with plastic wrap and find a warm place for it to rise. Your oven with the light on works perfectly! Let the dough rest for 2-12 hours until it roughly doubles in size.
- While the starter rises, we can prepare the flour mixture. In a separate large bowl, whisk together fresh flour and additional yeast. Once combined, add the salt.
- Gently sprinkle the flour mixture over the top of the risen starter dough. Cover the bowl again with plastic wrap and let it rest for another 1-4 hours.
Make the Main Challah Dough
- Now it’s time for the main challah dough. In your stand mixer bowl, combine the eggs, oil, honey, and apple cider vinegar. Mix on low speed until everything is incorporated and smooth. Gradually add the flour mixture to the wet ingredients while the mixer runs at low speed. Once everything is combined, increase the speed to medium and knead the dough for a few minutes. The dough should become smooth and elastic, pulling away from the sides of the bowl.
- Transfer the dough to a lightly floured surface and knead by hand for 4-6 minutes until it forms a smooth ball. Cover the dough with a kitchen towel and let it rest for 20 minutes.
- After resting, knead the dough again for a few minutes until it becomes stretchy and elastic. It should spring back slightly when gently pressed with your finger. The dough may still feel slightly tacky, but that’s okay.
Shape the Dough
- Shape the dough into a ball and lightly coat a large bowl with oil. Toss the dough ball in the oil to coat it completely. Cover the bowl and place it in a warm spot for another rise, allowing it to double in size again. This typically takes 1-2 hours.
- Gently deflate the risen dough and reshape it into a ball in the bowl. Coat it in oil again and cover the bowl. Let it rise for another hour or so until it doubles in size.
- On a lightly floured surface, gently roll out the dough. Cut the dough into three equal pieces using a dough scraper or knife. Let these pieces rest for 8-10 minutes. Preheat your oven to 350 degrees Fahrenheit.
Weave the Challah Braids
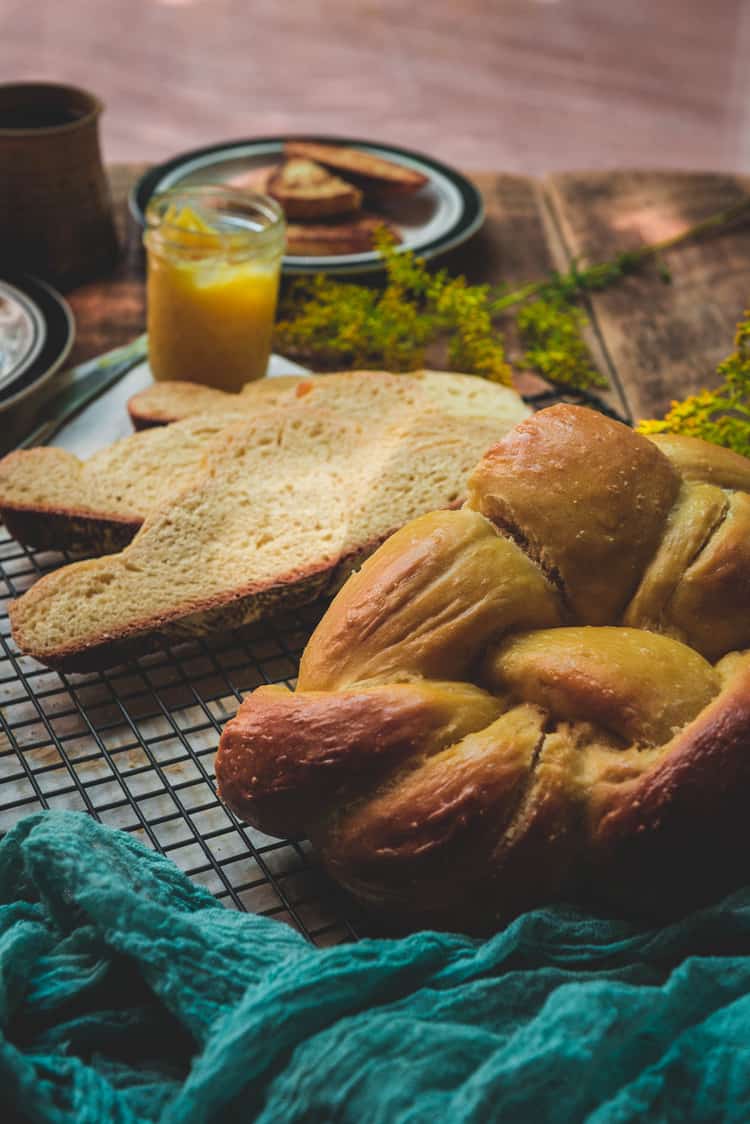
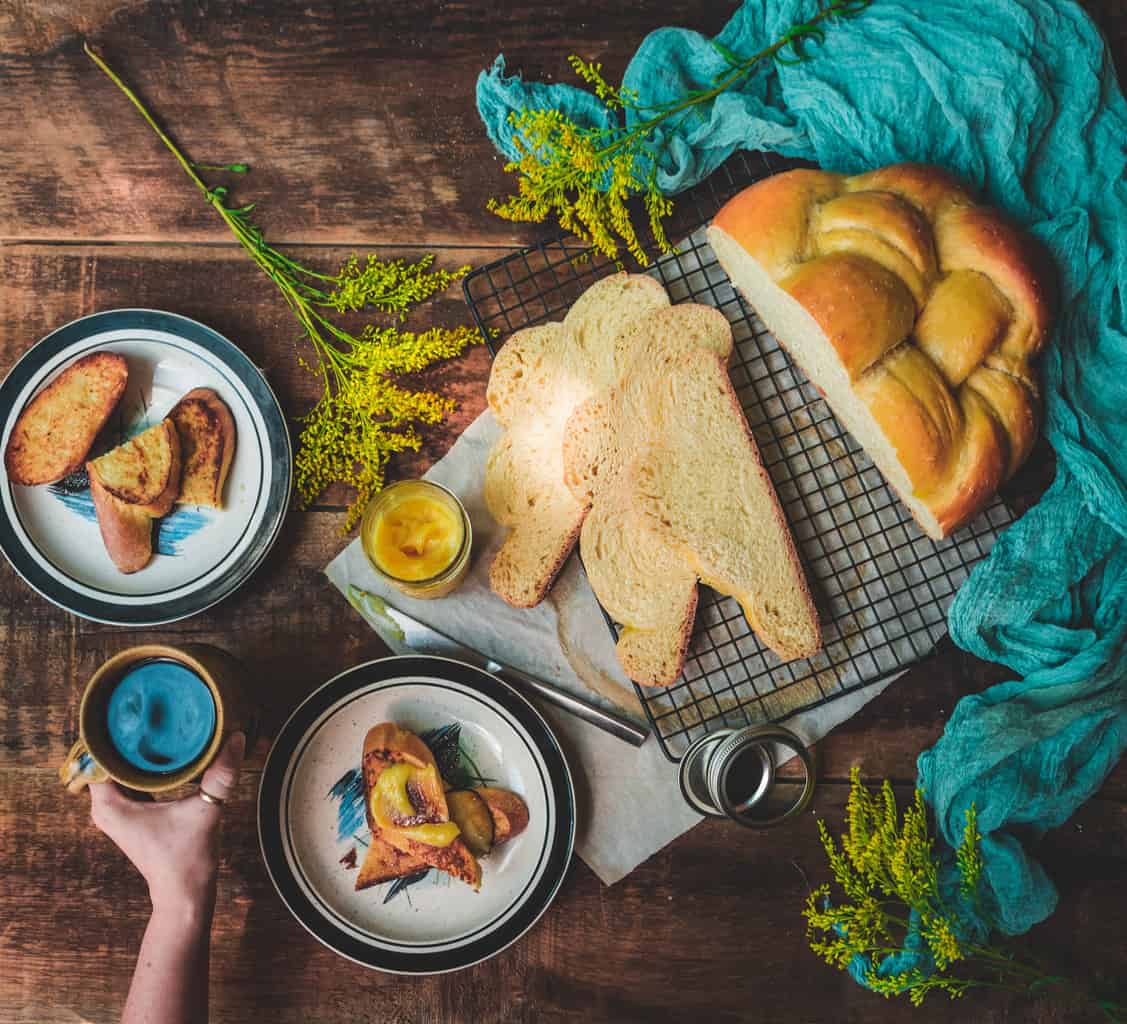
- Work with one piece of dough at a time, rolling it out into a long rope about 15-18 inches long. Gently stretch the dough as you roll. Lay the three ropes side-by-side and braid them together, weaving them from the center outwards. Pinch the ends together and tuck them under the end of the braid.
- Carefully transfer your beautiful braided challah onto a baking sheet lined with parchment paper. In a small bowl, whisk the remaining egg to create an egg wash. Brush the egg wash over the challah, avoiding puddles in the crevices.
Bake the Challah
- Bake the challah bread for 30-35 minutes or until it’s golden brown. You can also check for doneness by inserting a thermometer into the center of the loaf and ensuring it reaches an internal temperature of 190 degrees Fahrenheit.
- Let the challah cool slightly before slicing, and enjoy your delicious homemade bread!
Expert Recipe Tips
- This recipe makes a standard 6-braid challah, but you can make the braids thicker for a 4-strand braid.
- Don’t just dump and go! Proof your yeast by dissolving it in warm water (around 105°F) with a pinch of sugar. Let it sit for 5 minutes until foamy – this ensures your yeast is active and ready to make your dough rise
- Kneading is all about building gluten. This elastic network gives your challah its signature structure and beautiful rise. Aim for at least 5 minutes of kneading by hand or with a stand mixer. A smooth, elastic dough that springs back when gently pressed is your goal.
- Patience is key! Resist the urge to peek constantly. Bake your challah until it’s golden brown and reaches an internal temperature of 190°F. An instant-read thermometer is your best friend here for perfect doneness.
- Want an extra-soft crumb? Here’s a baker’s secret – place a pan of hot water on the bottom rack of your oven while baking your challah. The steam creates a moist environment, resulting in a softer texture.
How to Store Leftovers & Reheat
To keep your leftover challah soft and delicious for a few days, tightly wrap it in plastic wrap or aluminum foil. For the first day or so, you can store your wrapped challah at room temperature. This is perfect if you plan to enjoy it within 24 hours. If you think it’ll take longer to eat, it’s best to store it in the refrigerator after the first day.
Freeze for up to 2 months. When you plan on eating it, let it thaw on the counter.
To reheat, place a slice in the microwave for 10 seconds to gently warm the bread.
Now that you’re feeling good about your bread baking skills, give this gluten-free focaccia a try.
What to Serve With Challah Bread
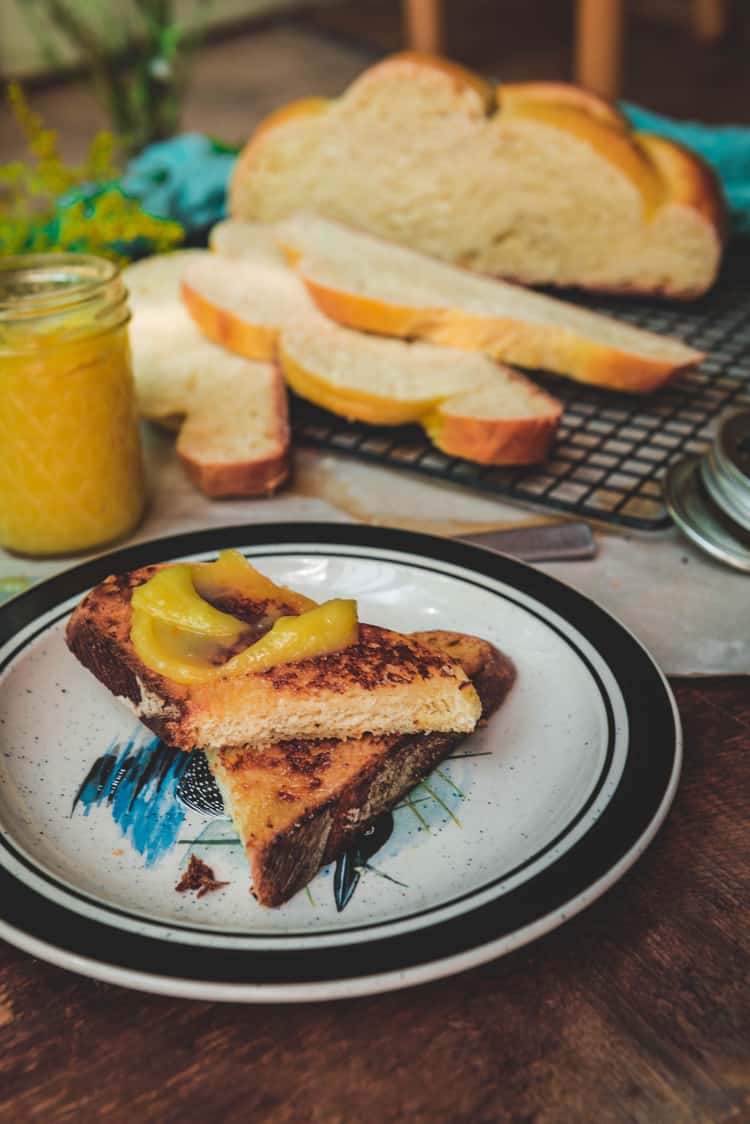
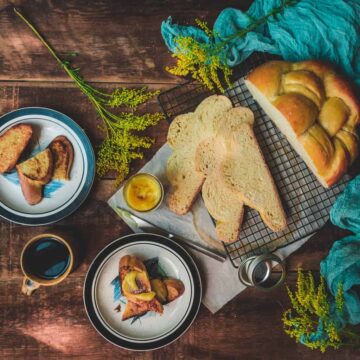
Enjoy it warm with butter or jam, or pair it with creamy chicken and wild rice soup. Feeling fancy? Transform it into decadent vanilla French toast or a comforting sausage and gruyere bread pudding. Leftovers can also be cubed for sausage and cornbread stuffing, or simply toasted for a yummy snack.

Next time you’re looking for a delicious and impressive bread to bake, give challah a try. If you try this recipe, please rate the recipe card and leave a comment down below to help out the next reader!
Homemade Challah Bread
Ingredients
For the Dough Starter (sponge)
- 1 tsp active dry yeast
- 2/3 cup warm water
- 1 cup AP flour
- 2 tbsp honey
- 3 large eggs - room temperature
For the Flour Mixture
- 4 2/3 cups AP flour
- 1 ¼ tsp active dry yeast
- 1 tbsp salt
For the Dough
- 2 large eggs
- 1/3 cup vegetable oil
- 6 tbsp honey
- 1 tbsp apple cider vinegar
- 1 large egg - for wash
Instructions
Make the dough starter:
- In a small bowl, whisk together yeast and water. Allow the yeast to bloom in warm water for 5 minutes.
- In the bowl of your stand mixer, fitted with the hook attachment, whisk together the flour, yeast mixture, honey, and eggs until smooth and no clumps remain.
- Cover the bowl with plastic wrap and place in a warm dry area (I use the inside of my oven).
- Let the starter stand 2 to 12 hours, until ready to make the challah.
For the Flour Mixture:
- In a large clean bowl, whisk together flour and yeast.
- Once combined, add in the salt.
- Gently, sprinkle the flour mixture over the top of the sponge and cover with plastic wrap.
- Allow the mixture to stand 1 to 4 hours.
Make the Challah Dough:
- In a the bowl of your stand mixer, combine the eggs, oil, honey, and apple cider vinegar until combined.
- Gently, add the flour mixture, and stir on low with the dough hook until well combined.
- Run the mixer for a few moments until the dough just starts to come together and peel back from the bowl.
- Fold the dough out on to a clean work surface, lightly dusted with flour, and knead until the dough comes together into a smooth ball, about4 to 6 minutes.
- Place a towel over the dough and let it rest for 20 minutes.
- Knead the dough again until the dough is very elastic. The dough will spring back a bit when pressed gently with your finger. The dough will be slightly tacky to the touch.
- Shape the dough into a ball.
- Lightly coat a large with oil.
- Place dough in bowl, and turn it a bit to coat it in oil on all surfaces. Cover and place in a warm spot.
- Allow to rise until doubled, about one to two hours.
- Punch the dough down gently with your hands and reshape in the bowl. Toss it to coat in oil again and cover.
- Allow to double a second time, for about an hour longer.
- Turn dough out onto a lightly floured surface and flatten gently with your hands.
- With a dough scraper or knife, cut into three equal pieces and allow to rest 8-10 minutes.
- Preheat oven to 350 degrees.
- Working one at a time, roll each portion of dough into a long rope, about 15-18”, gently pulling and stretching as you go.
- Arrange the dough laying side by side and start a braid, weaving them in upon one another working from the center out to either side.
- Bring the two ends together, folding and tucking under itself.
- Transfer the the dough onto a baking sheet lined with parchment paper.
- Beat the remaining egg in a small bowl, and with a brush the challah, making sure to not allow any puddles to form in the creases.
- Bake 30-35 minutes, until the loaf is golden, or registers 190 degrees in the very center with your wireless thermometer.
Notes
Nutrition
Nutritional informations provided as a courtesy and is only an approximatation. Values will changes based on ingredients used.
⭐ Tried this recipe? Rate it ⭐
Help out the next person and give it a star rating below!
That sounds so yummy! I’ve never heard of challah bread before, but I have to make it! Om nom nom.
The dish is delicious. I am keeping this recipe got to try this later.
Bread is one of my favorite things to eat. This recipe looks awesome.
This is one of my favorite breads to make. Great for French toast too!
I am so excited to have come across this post! I am very much looking forward to sharing this recipe.
Thank you for sharing!
Alex xx || itsnotcomplicatedrecipes.com
Oh your photos are gorgeous! This bread does sound amazing and looks like it would taste so good.
Whoa! I love Challah bread! This looks so yummy and doesn’t seem so hard to do! Beautiful pictures!
Thanks so much for sharing!
I think challah bread is easily the prettiest bread to photograph. Your photos are amazing, by the way. I have eaten challah but never made it myself.
Glad to learn something about jewish dish here. I have very little knowledge on jewish cuisine. However I tasted one Jewish freshly made bread in Max original in California USA and Max is actually started by a Jewish owner. The bread tasted so good and unforgetable for me. I would love to try Challah out, the pictures tell me it should taste good.
We love challah bread! My husband makes the most amazing French toast with challah bread!
it sounds like a great recipe. your photos look amazing! i’ll have to try this
Thanks,
Outsource Photo Editing Firm
Never heard of this type of bread. I noticed you said the half slice was worth it. I definitely want to try now b
I’ve never had Challah bread before, but this looks delicious. I would love to try making this sometime.
I love trying new culture food. Plus I love bread.